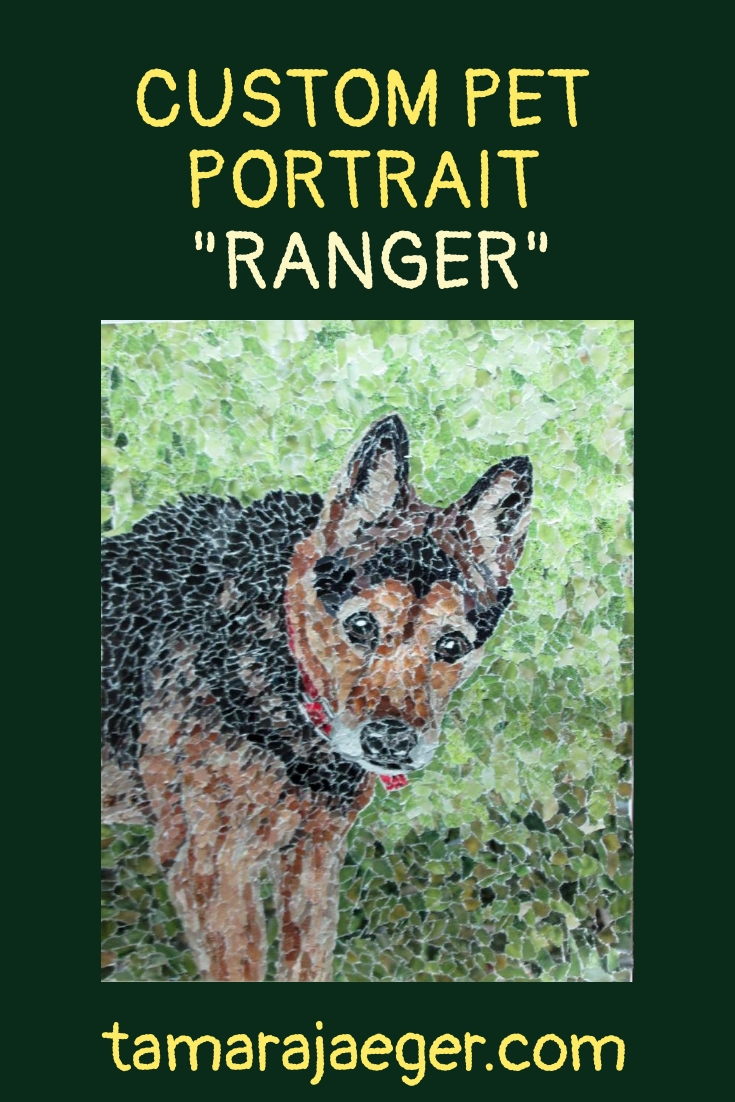
“Ranger” Custom Dog Pet Portrait
Ranger was a mixed breed dog that was taken in as a stray by some of my neighbors many years ago. I only met Ranger a few years ago when I moved to my current house in Ohio. He was a really nice dog who put up with my over-the-top Grendel’s antics on an almost daily basis.

Grendel and Ranger used to go for walks together frequently and Grendel was always looking to see if Ranger was outside whenever we passed his house. Ranger eventually lost most of his sight but he would usually still go around the block if Grendel was there to help guide him.
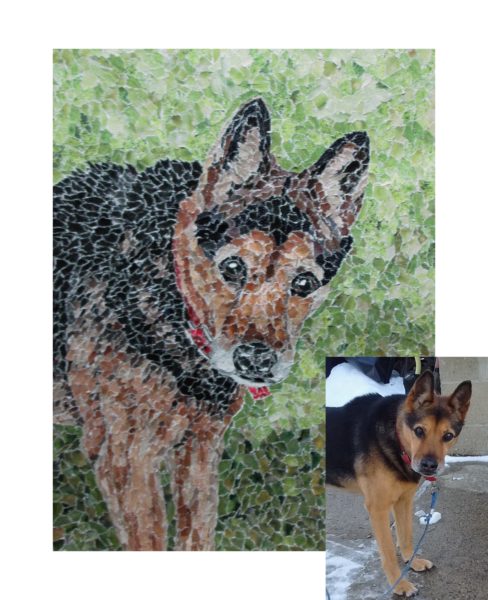
Sadly, Ranger passed away earlier this year at roughly 17 years old, but I’m pleased that his owners not only had a chance to enjoy the portrait while he was alive, but also that they still have something special to remember him by.
Would you like a custom portrait of your own pet? They also make a great pet memorial or gift! You can check out the process here or email me at tamara@tamarajaeger.com. I’m happy to answer any questions you have!
Want to keep updated and see more of what I’m working on? Sign up for my mailing list here and get a totally FREE digital download of a tiger linocut print. (I promise not to be spammy with my emails—I hate that too!)
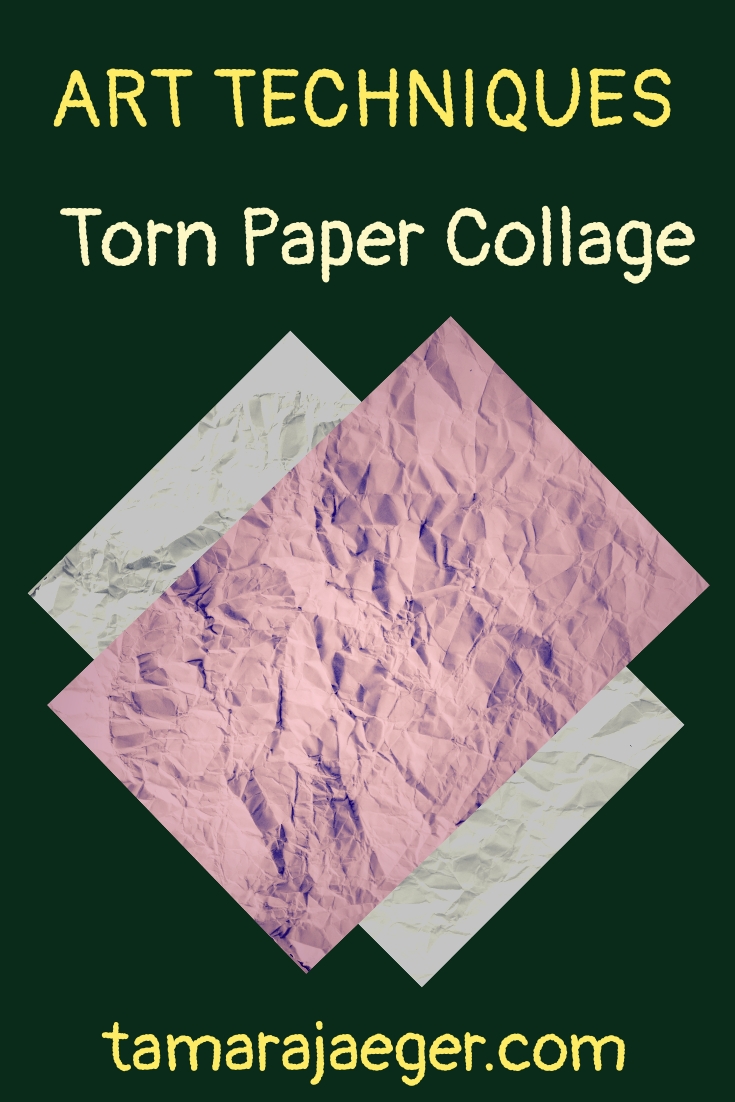
Art Techniques: Torn Paper Collage
Today I’m going to walk you through my process for creating a torn paper collage, like my custom pet portraits.
- Draw out the design on paper.

I use acid-free artist’s drawing paper drawing paper in varying sizes. My favorite is 9 inches x 12 inches, since this gives a nice, intimate-sized piece that still allows for excellent detail. It also doesn’t feel like an endless marathon of collaging, like larger pieces can. Large collages do provide a nice, bold statement though, so that’s something to keep in mind when deciding on the size.
- Select pieces of magazines and catalogs with desired/suitable colors.
I have a big stack of magazines and catalogs in my studio, so I have plenty of material to choose from. Since I primarily make animals and pet portraits, I look for large areas of natural and neutral colors like grays, tans, browns, white and black. Blues and greens make excellent background colors, so I also focus on collecting catalogs that contain these. The texture of the paper is somewhat important—some catalog papers don’t tear well, which makes it difficult to tear the tiny, precise fragments that I use in my collages. Some of my favorite catalogs are the LL Bean and Restoration Hardware ones. Those are great for finding the colors use a lot of!
- Apply adhesive to a section of the drawing.
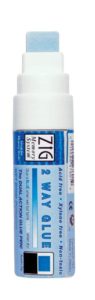
I use the Zig/EK Tools 2-Way Glue, which I previously reviewed here. It’s acid-free and archival and easy to apply in precise areas. I’ve tried several other acid-free scrapbooking adhesives, but the two-way glue is by far my favorite. I use the wide, chisel tip for covering large areas and the fine-point pen or fine-point chisel tip for adding glue to smaller areas or next to areas of the piece I’ve already completed. The glue remains tacky after drying so if I misjudge how long a section will take me, the paper fragments will still stick.
- Carefully hand-tear the magazine pieces to desired shape and size.


I carefully select and tear each and every paper fragment by hand. Every. Single. One. Whiskers are incredibly tricky to tear by hand, if you were wondering. I’m constantly trying different techniques to hand-tear thin, delicate whisker strips. If the whiskers are too thick and bulky, they can really detract from the overall look of the piece.
- Place the paper pieces onto the adhesive
I place the paper fragment using fine-point tweezers. You can use your fingers, but they get sticky very quickly, making it hard to get the paper fragments to stick to the substrate and not your fingers. Also, I typically use such tiny fragments that it’s nearly impossible to place them accurately with my fingers. I don’t remember where I got my tweezers but I think I should look into getting a second (and maybe a third) pair—I’d be completely lost if mine were ever missing or damaged!
- Repeat steps 3 through 5.
Over and over and over. This is definitely Not a fast process. Each collage takes many, many hours of work. It’s also important to take frequent breaks to give your hands, back, eyes and brain a break. I don’t recommend multi-hour marathon collage sessions.
- Success! You now have a completed torn paper collage masterpiece!
So, are you ready to give torn paper collage a try? Drop any questions below. I’m happy to help.
Is making a torn paper collage totally not your thing but you still want a piece with that unique look and feel? Check out the pieces I have for sale here.
Would you like a custom portrait of your own pet? You can check out the ordering process here or email me at tamara@tamarajaeger.com with any questions!
Want to keep updated and see more of what I’m working on? Sign up for my mailing list here and get a totally FREE digital download of a tiger linocut print. (I promise not to be spammy with my emails—I hate that too!)
* Please note that this post contains affiliate links and any sales made through such links will reward me a small commission – at no extra cost for you.
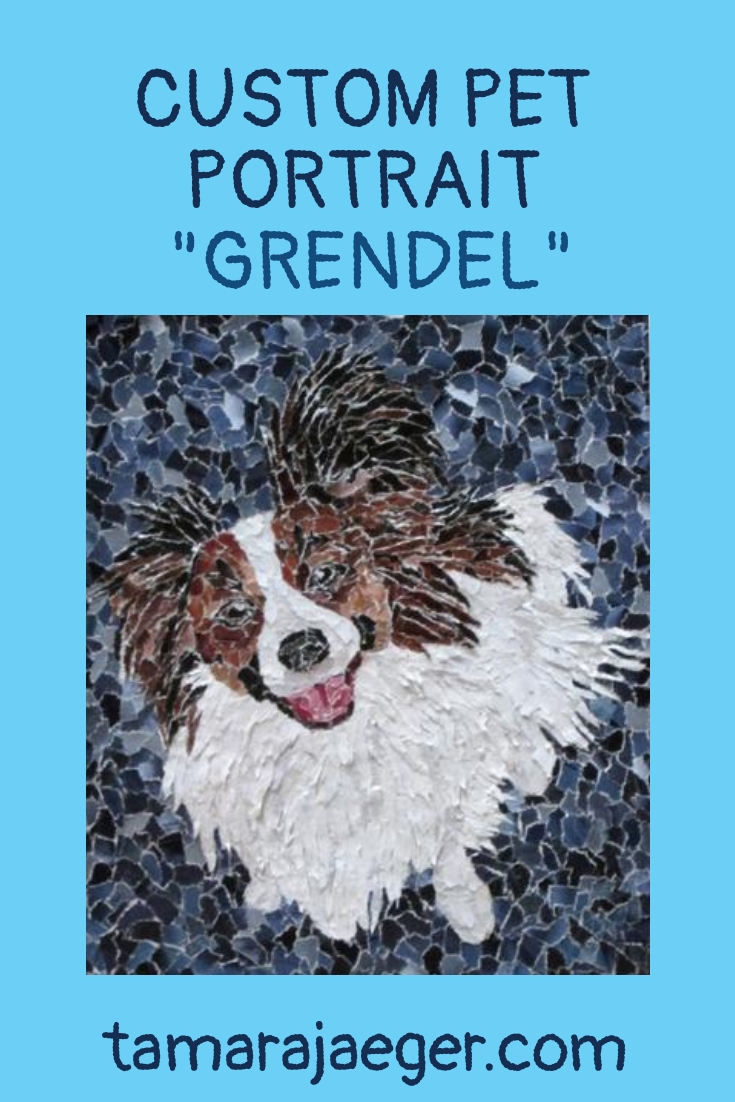
Grendel: Custom Papillon Dog Pet Portrait
This is a custom pet portrait I created of a Papillon dog. Grendel is actually my dog, but the portrait was for my sister, who was his breeder and hand-raised him as a puppy (Grendel’s mother was…not very maternal so he had to be bottle-fed).
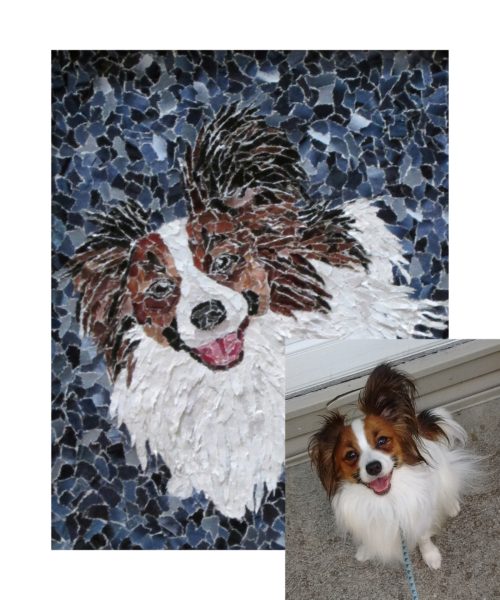
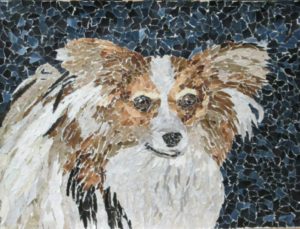
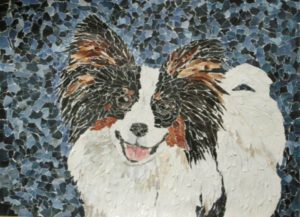
This portrait was intended to go with a pair of pet portraits I previously made of my sister’s two Papillons, Emmie and Windi. The intent was to create a piece that visually went well with the other two portraits while still expressing Grendel’s unique personality. I enjoyed the challenge of creating a piece that felt harmonious when paired with two other pieces that were created several years earlier.
Would you like a custom portrait of your own pet? You can check out the process here or email me at tamara@tamarajaeger.com with any questions!
Want to keep updated and see more of what I’m working on? Sign up for my mailing list here and get a totally FREE digital download of a tiger linocut print. (I promise not to be spammy with my emails—I hate that too!)
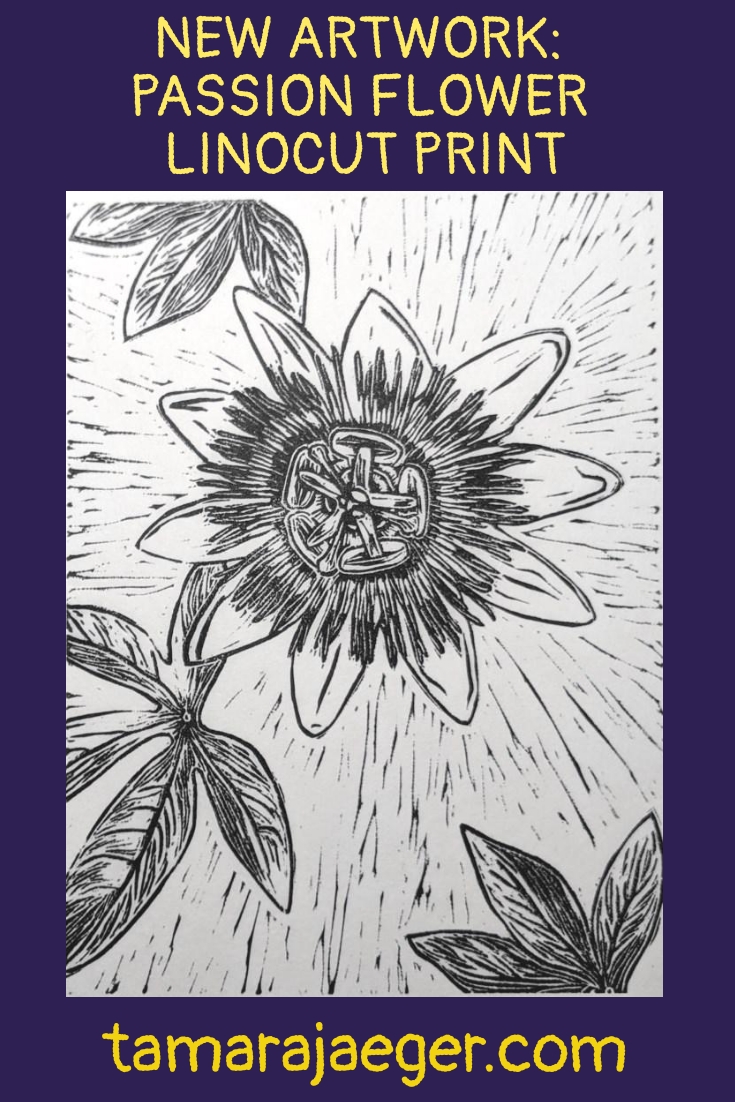
New Artwork: Passion Flower Linocut Block Print
In some previous posts, here, here and here, I introduced a series of linoleum block prints of flowers that I am working on. Unlike the other prints in the series, this one isn’t an orchid! Instead, it’s a passion flower.
The original flower this was based on was white with dark blue and purple accents. I purchased the flower as a gift for my father and it started booming before I had a chance to give it to him (Don’t worry—I did finally manage to get it to him, and it was still blooming away, so all is well!).

I tried out some new carving tools for this block and sadly, I’m not at all happy with them. For a while, I seriously doubted if the block could be salvaged and thought I’d have to completely re-carve the design on a new piece of linoleum with my original tools. Linoleum is very unforgiving of mistakes or slips of your tools. But it all turned out okay in the end.
This print, along with the other flower prints in the series, will soon be available for purchase in both my Etsy shop and on my website.
Want to keep updated and see more of what I’m working on? Sign up for my mailing list here and get a totally FREE digital download of a tiger linocut print. (I promise not to be spammy with my emails—I hate that too!)
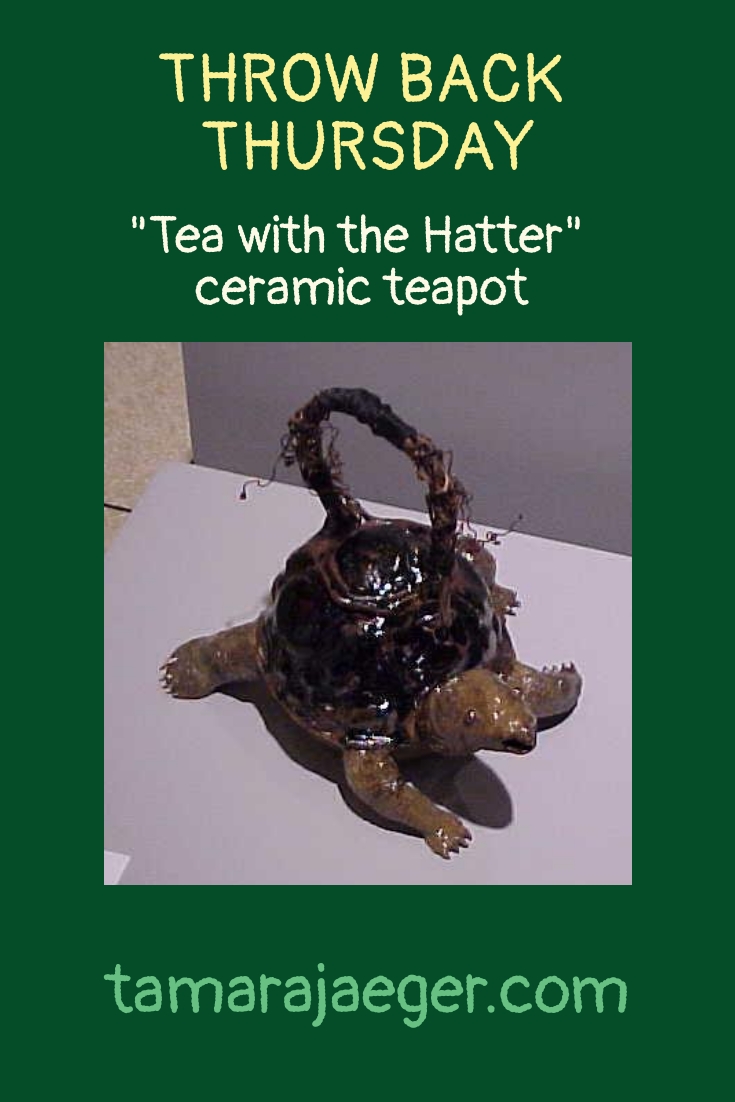
Throwback Thursday: “Tea with the Hatter” ceramic turtle teapot
This piece is a particular favorite of mine, from when I was working in ceramic in college. I loved ceramics and hope to someday have access to the facilities to pick it up again. Life goals, I guess. In the meantime, there are plenty of other perfectly good mediums to work in!
Anyway, this is a high-fired stoneware teapot shaped like a turtle. I titled it “Tea with the Hatter” to play up the Alice in Wonderland-like sense of slightly bizarre fun. It is actually a functional teapot, though I confess I’ve never used it for the purpose. The grapevine handle is reinforced inside with heavy wire to support the weight of the vessel when filled with liquid.

Are there any mediums you wish you could try out or ones you wish you could go back to? Tell me in the comments!
Want to keep updated and see more of what I’m working on? Sign up for my mailing list here and get a totally FREE digital download of a tiger linocut print. (I promise not to be spammy with my emails—I hate that too!)
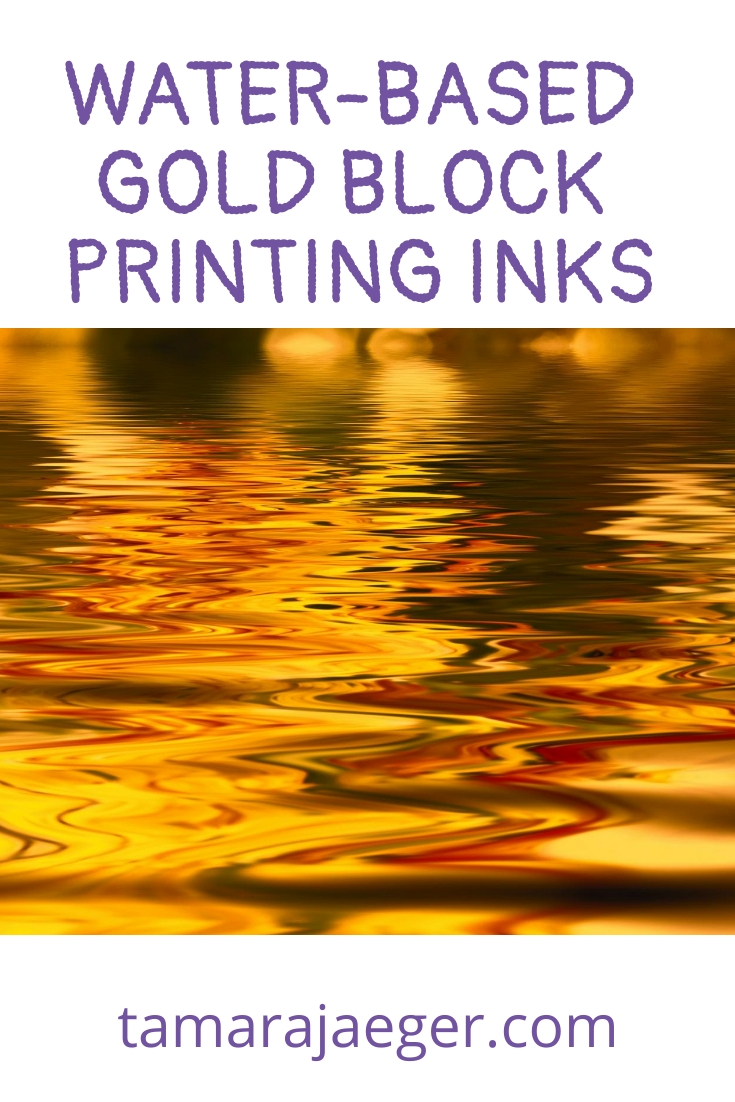
Review: Water-Based Gold Block Printing Inks
If you’ve been following along with me, you know that I’ve been working quite a bit lately on linocut block prints (if you haven’t been following me, you can check out some of my earlier posts here and here). I’ve been trying out some new printing inks, trying to find ones that have better working properties than the ones I had been using previously but that are still easy to clean up without solvents and with good lightfastness.
and here). I’ve been trying out some new printing inks, trying to find ones that have better working properties than the ones I had been using previously but that are still easy to clean up without solvents and with good lightfastness.
One of the colors I’ve enjoyed printing in is gold. It’s kind of difficult to find gold block printing ink in general and even harder to find a good one!
Today, I’d like to compare two of the inks I’ve tried out so far: Speedball Water-Based Gold Block Printing Ink and Schmincke Aqua Gold Linoprint Ink.
I’ve used the Speedballwater-based inks for years. They’re easy to find, inexpensive, non-toxic, and very easy to clean up with soap and water. I’ve never been very happy with their working properties, however, which has led me to my current quest to find a ‘better’ block printing ink.
Speedball Water-Based Block Printing Ink
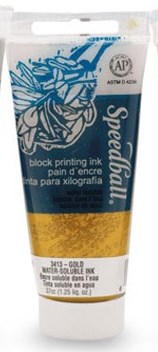
The issue I have with all the water-based Speedball inks is their poor working properties. They dry too quickly, especially in warm weather or in the winter when the indoor humidity is low. This makes it difficult to print the image evenly, since you have to work Very quickly. I’ve often only managed to get a couple good prints at a time, with many more that are poor quality—patchy or with faded areas. But they do make a gold ink. It’s not terrible. More of a coppery color than gold, in my opinion.
Schmincke Aqua Linoprint Ink
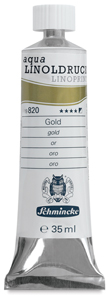
I discovered Schmincke Aqua linoprint inks online recently. They’re water-based, so they clean up easily and without needing to use harsh solvents. The reviews I read were generally quite favorable so I decided to give them a try. They’re not cheap, however.
I had such high hopes when I rolled this ink out on the plate! Sadly, so far I hate the ink. Like, really hate it. To be fair, the color of the gold ink is fantastic. It’s a nice, bright, iridescent gold. I just could not get a good print out of it. Now, it may be that I just need to spend some time experimenting to figure out the best technique for inking the plate and printing the piece. My current technique certainly doesn’t seem to be working!
I had two main issues with the Schmincke ink—getting good ink coverage on the plate and removing the paper from the plate after printing. The Schmincke ink is, I think, a thinner consistency than the Speedball ink. This is good in that it lets you print fine details more easily, without clogging up the plate and filling in shallow cuts—a definite issue with the Speedball inks. Indeed, the Schmincke ink did give me more delicate-looking lines in the finished print. The problem was that I couldn’t get it to stick to the entire plate evenly so I lost a lot of detail in the overall image. It’s almost like the ink simply wouldn’t stick to the plate. It was incredibly frustrating. I thought at first it might be an issue with residual oil from the other ink I had used on the plate, but I had the same problems when I tried it out on a plate that I had only ever used water-based inks on.

On the other hand, once I inked the plate and printed it, it was very difficult to pull the paper off the block. That sucker was stuck down like I had used superglue! Weird, considering how hard it was to get the ink on the plate in the first place. Now it doesn’t want to come off? The ink does seem to get Very sticky as it dries. I like to use a thin Japanese paper for my linocut prints but this paper gets bent and warped and distorted trying to pull it off the plate with the Schmincke ink. A heavier paper may help with this; I’ll have to give it a try and see.
So far, I have one ink that prints okay-ish with an indifferent color ( Speedball) and one ink with a stunning color and a terrible printing experience ( Schmincke). I definitely will continue to test out the Schmincke ink to see if I can figure out a way to get good prints with it. I really do like the color!
If you’re interested, you can also read my thoughts on Caligo Safe Wash water-soluble block printing ink here (spoiler alert: I love it!). Sadly, Caligo doesn’t have any metallics in their Safe Wash line. The do have a gold ink in their traditional oil-based ink line that I may have to try out, despite the greater difficulty in clean up.
Have you tried out any water-based printing inks? What about metallic inks? What have your experiences been with them? Tell me below!
* Please note that this post contains affiliate links and any sales made through such links will reward me a small commission – at no extra cost for you.
Want to keep updated and see more of what I’m working on? Sign up for my mailing list here and get a totally FREE digital download of a tiger linocut print. (I promise not to be spammy with my emails—I hate that too!)
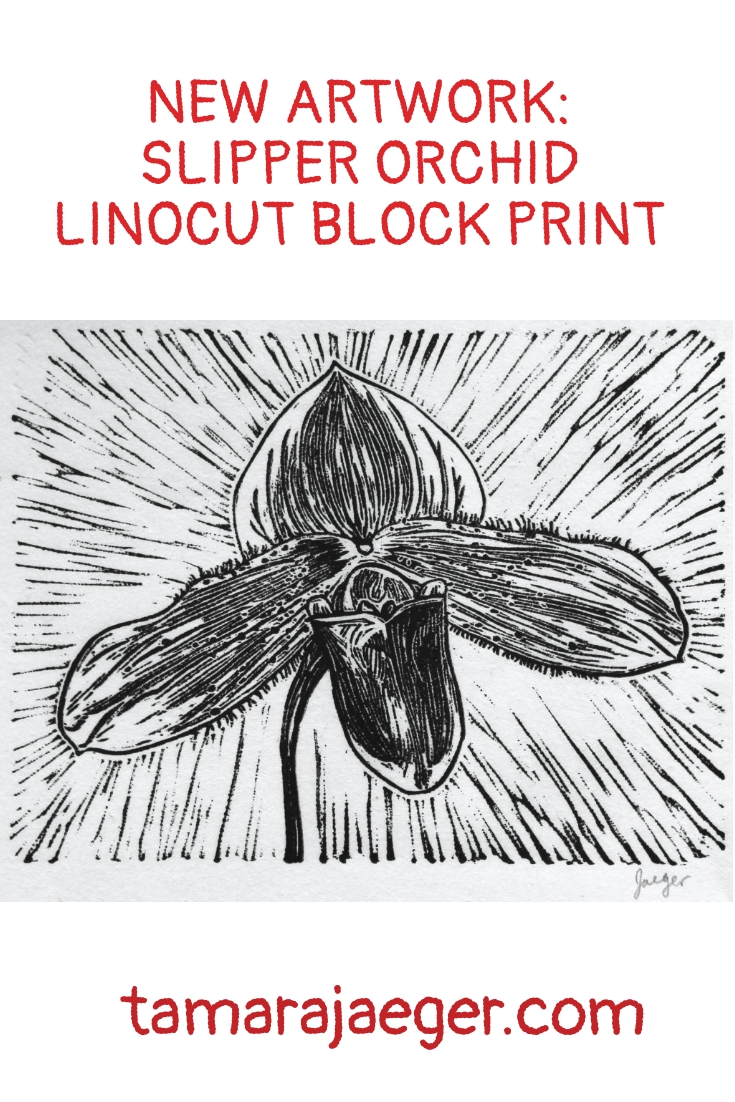
New Artwork: Slipper Orchid Linocut Block Print
In a couple previous posts, here and here, I introduced a set of linoleum block prints of flowers that I am working on. This is the third print in the set, a Paphiopedlium or slipper orchid.
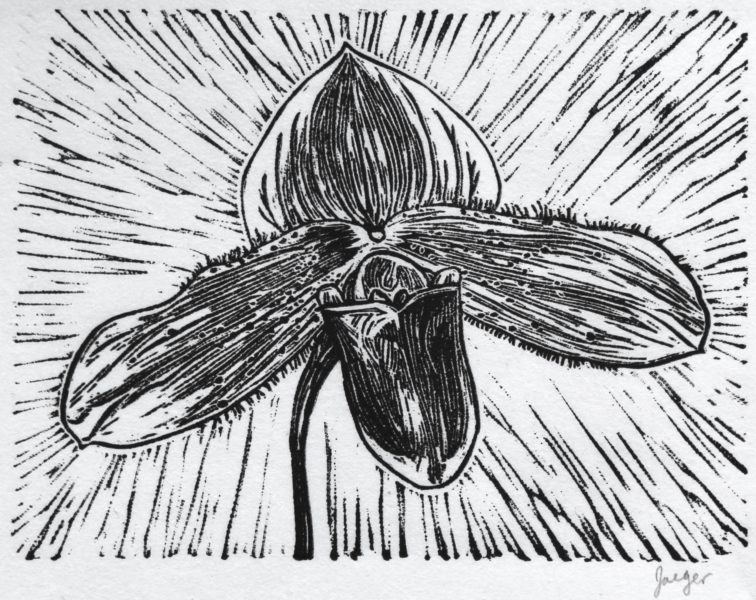
The original flower this was based on was a neat green and purple/maroon color. I got the flower at a local orchid society show this spring and was thrilled with the colors when it finally bloomed. It’s hard choosing an orchid when you don’t know what the flower will look like!
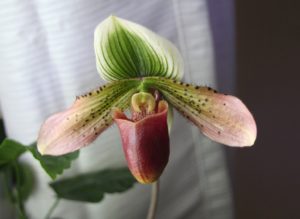
I’m actually really pleased with how this one turned out. I suspect it would also look great in color. I may try out a limited edition of hand-colored prints with this piece. What do you think? Let me know in the comments!
This print, along with the others in the set, will be available for purchase shortly in both my Etsy shop and on my website.
Want to keep updated and see more of what I’m working on? Sign up for my mailing list here and get a totally FREE digital download of a tiger linocut print. (I promise not to be spammy with my emails—I hate that too!)
7 Must-Have Oil Painting Tools
Today I’d like to give a quick round-up of the tools I find indispensable when painting in oils. My must-have tools for acrylics are somewhat different, due to the different types of paintings I create with the different mediums. I’ll do a post on my favorite tools for acrylic painting at some point soon!
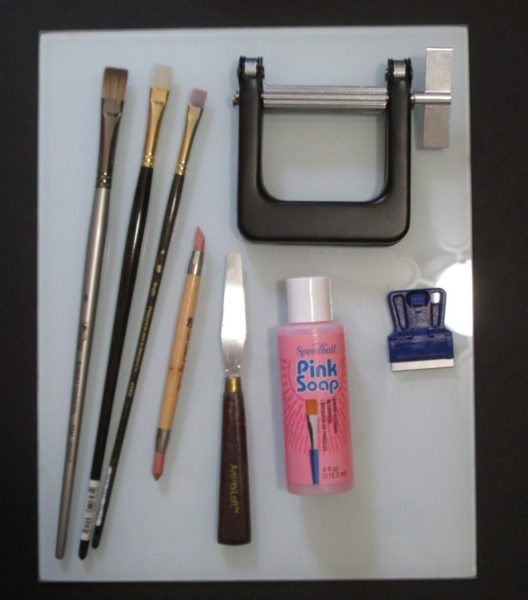
1. Tube wringer

I love this thing. It’s fantastically sturdy and heavy duty. It squeezes even the largest tubes with ease and doesn’t slip on the tube during use like some of the less expensive ones do. It does a fantastic job of squeezing out the last bits of paint from the tube, so you don’t waste any.

I use this primarily to mix paints on my palette. I have a whole set of various palette and painting knives, but mostly I just use this one. (In case you were wondering, a palette knife has a straight or very slightly bent handle while a painting knife has a large bend in the shaft between the handle and blade)
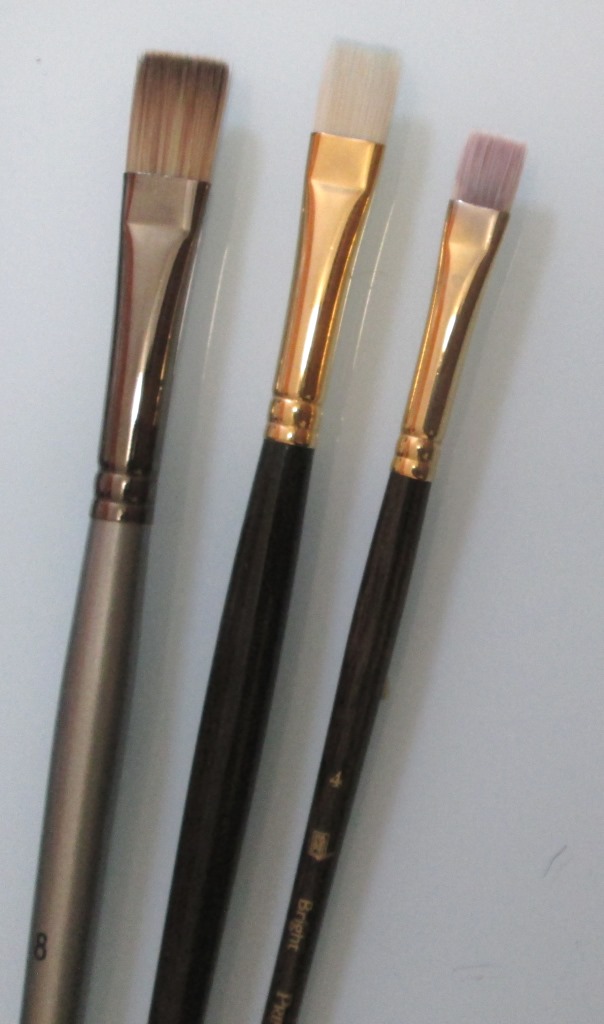
My favorite brush is the ‘bright.’ It’s a shorter version of the square-shaped ‘flat’ brush. I use these in a variety of sizes and tend to have multiples of each size so I don’t have to clean them off when I switch colors during a painting session. I also prefer the softer synthetic bristle brushes to the traditional bristle brushes.
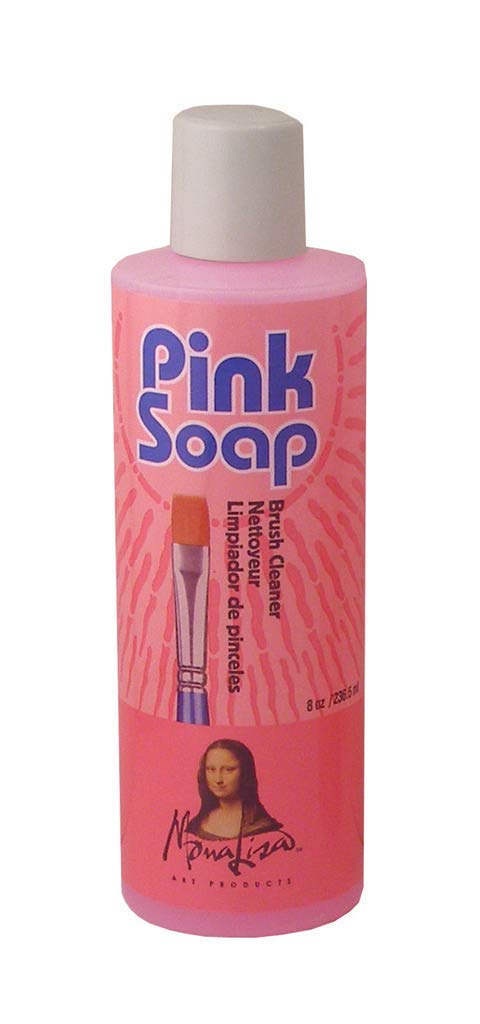
This stuff is amazing. I first discovered it during college when I was taking a painting class, though it was my mother, who worked at Michaels at the time, who introduced me to it. It does a great job of removing paint residue from brushes (and clothes, I’ve been told, though I haven’t tried it for that myself) and hands. The scent is pleasant and not overpowering and it works very well for cleaning up both acrylic and water-mixable oils. I also used it to finish cleaning my brushes after cleaning them with turpentine/turpenoid when I was using traditional oils. They seem to have changed the name recently, as my newest bottle calls it Speedball Pink Soap.
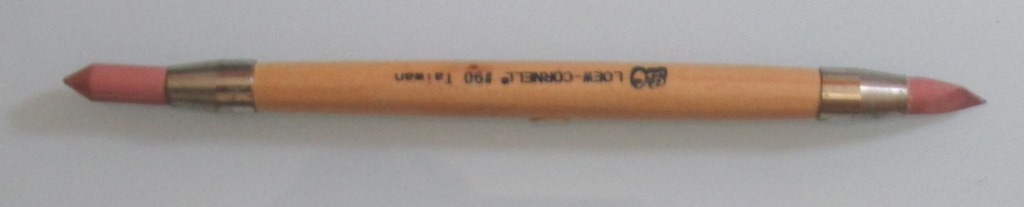
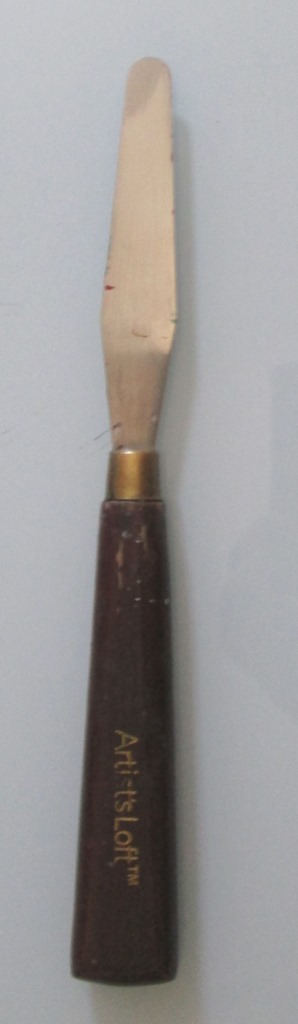
Another fantastic invention. My mother gave me one as a gift once and I wish I had found it sooner. It’s great for tidying up edges and removing slight mistakes when your paint is still wet. There are two ends—a pointed, cylindrical one and a straight-edged wedge end. I use the wedge end almost exclusively.
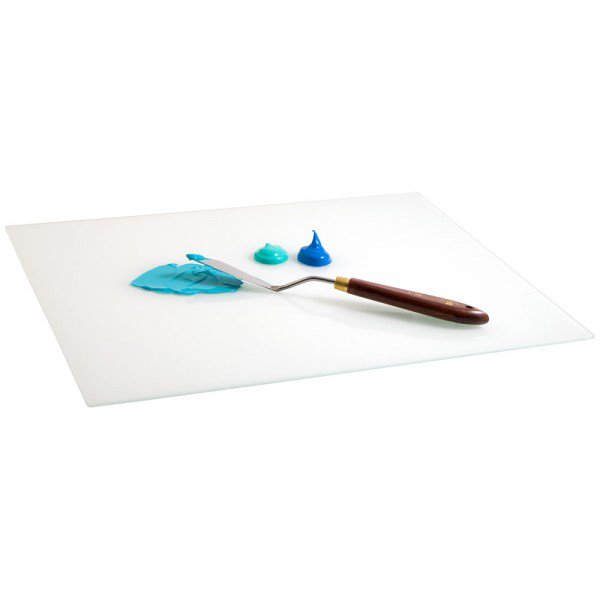
My all-time favorite palette. I searched long and hard for something like we used in my painting class, which were glass-topped cabinets on wheels. I like to have my palette on the table next to me when I paint rather than holding it in my hand. I love how easy it is to clean off the palette too. Which brings me to the last item in my list:
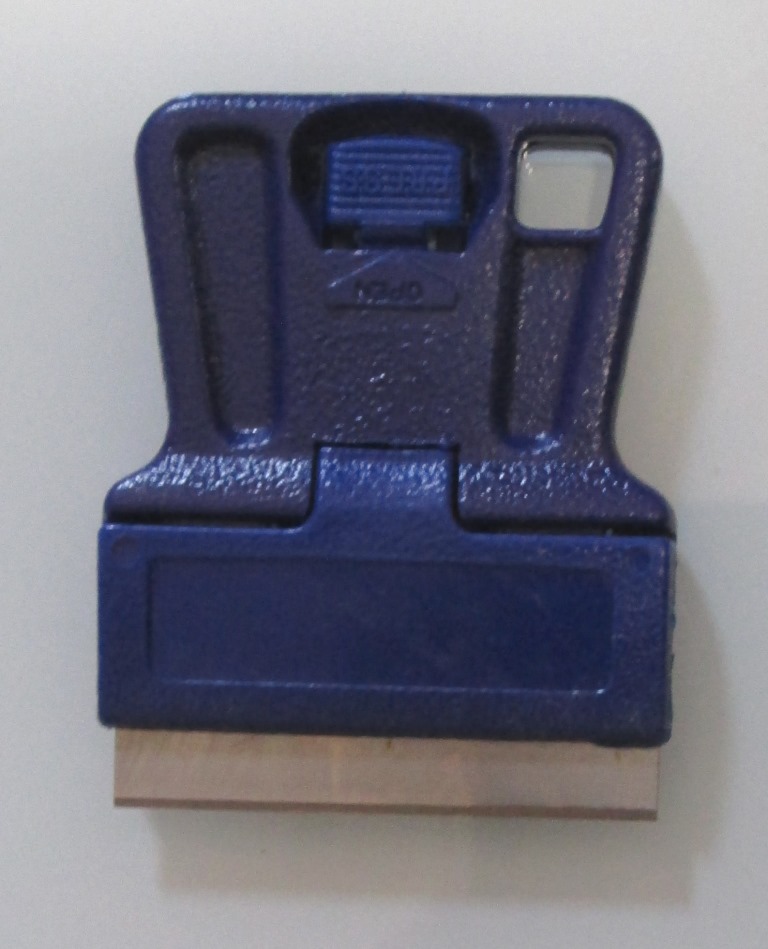
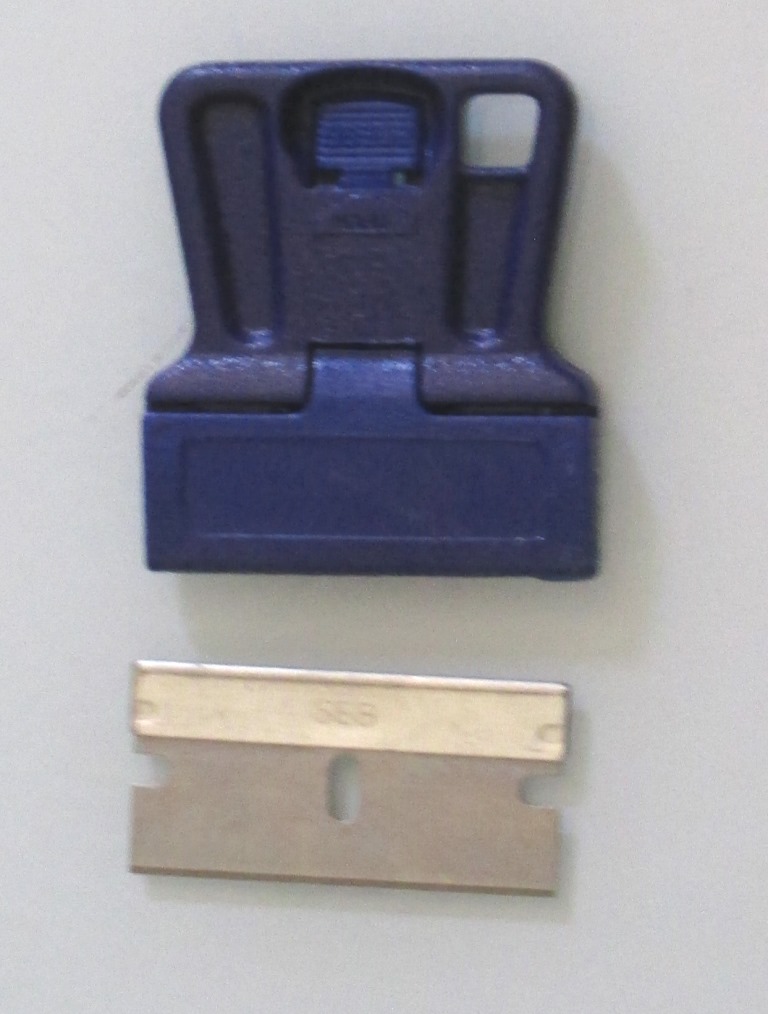
I use this to clean off my glass palette. Once the paint dries, all you have to do is gently scrape the palette and all the paint comes right off. You do have to take care with the angle of the blade while you’re scraping, to prevent scratching the glass. The scraper takes a standard razor blade which you can reverse so the sharp end is inside the handle for storage. I found mine in a small, local art supply store in Connecticut but I’ve also seen them in the paint departments in stores like Home Depot and Lowes. They’re inexpensive and so worth it!
What are your favorite painting tools? Tell me in the comments below.
* Please note that this post contains affiliate links and any sales made through such links will reward me a small commission – at no extra cost for you.
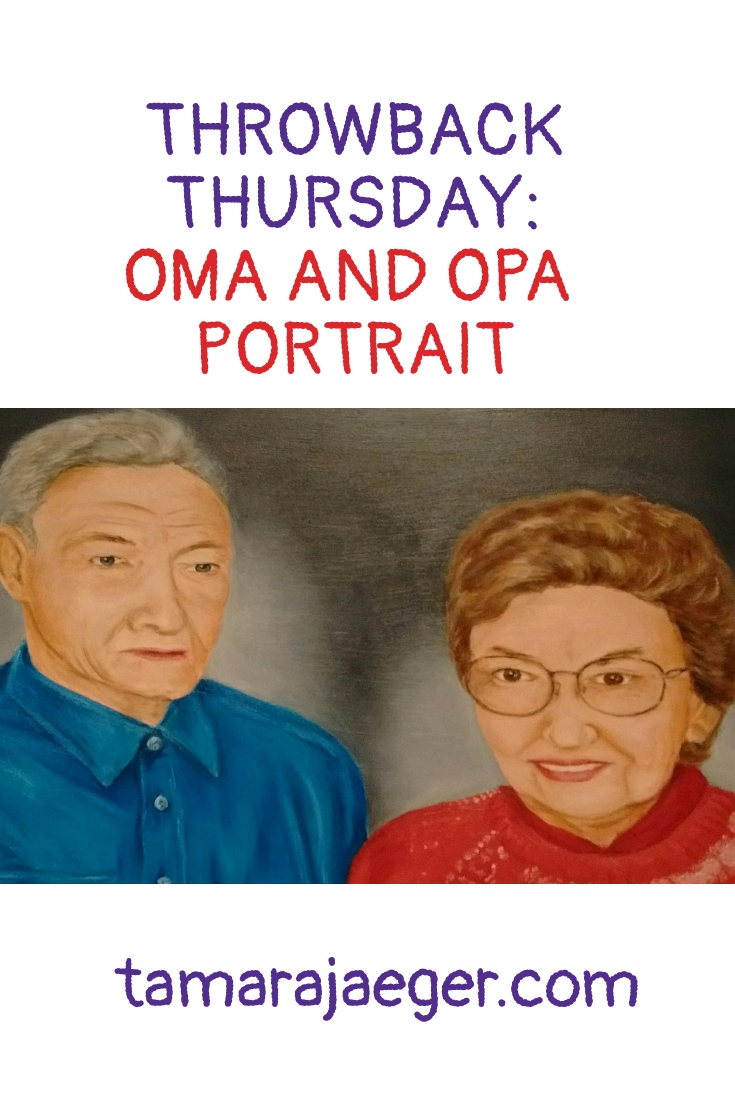
Throwback Thursday: Oma & Opa portrait
This is a fairly old piece and one of the Very, very rare paintings I’ve done of people. I don’t like using people in my artwork and portraits in particular are frustrating to me. I can paint a person, and it looks like a person. It even looks like the person it’s supposed to be. But it always seems to be missing that special something that really captures the essence of the person. Strangely, I don’t seem to have the same problem when I create portraits of animals. I’m not sure what the difference is there…
Anyway, this is an oil painting portrait of my grandparents (Oma and Opa are ‘grandma’ and ‘grandpa’ in German). I don’t remember the exact date—I painted it right before one of the times that I moved to the UK. I think it was the first time, so it’s probably from 1997.

After immigrating to the US from Germany, my Oma wanted to have a house full of oil paintings. She associated them with being well-off financially, I think. And actually, she Did end up having a house full of oil paintings, so I guess that dream was realized! I painted this portrait of my Oma and Opa as a gift for my Oma. What better gift for her than an oil painting, right? And it hung on the wall with all her family photos for years.
Oma passed away a few months ago, at almost 95 years old. She and I shared a birthday, which always seemed like a special thing. With my birthday coming up next week, I’ve been thinking about my Oma, so I thought I’d share this special piece in remembrance of her.
Want to keep updated and see more of what I’m working on? Sign up for my mailing list here and get a totally FREE digital download of a tiger linocut print. (I promise not to be spammy with my emails—I hate that too!)

Inspiring Your Art: Attraction and Creation
For your inspiration this week, I’d like you to consider this quote by Buddha:
“What you think, you become. What you feel, you attract. What you imagine, you create.” — Buddha
We are constantly busy dealing with the minutia of our daily lives and frequently don’t take the time to slow down and reflect on the bigger picture. I think we often forget how intimately connected our thoughts, emotions and actions are.
A lot of times, I find myself focusing on all the things that need to get done or the things I’m missing rather than on what is good and right with my world and I’m sure many of you do the same .
What if, instead, we take a moment to reflect on the good—the things that are going right, the things that make us happy? Instead of attracting scarcity and business and chaos, we can instead create happiness and peace.
How does this quote relate to your artwork or your life in general? Tell me in the comments below!
Want to keep updated and see more of what I’m working on? Sign up for my mailing list here and get a totally FREE digital download of a tiger linocut print. (I promise not to be spammy with my emails—I hate that too!)