Posts Tagged: elementals
Artwork Series: Elementals
Earlier this week I talked a bit about creating art in a series. I’d like to talk a bit more today about one of the series that I mentioned in that post—my “Elementals” series.
I created the “Elementals” with the intention of exploring color and texture within the framework of the four (western) elements: fire, water, air, and earth. I decided there would be three pieces for each element, each piece would be on the same size canvas, and the pieces for an element would use the same color palette. I also wanted to title each piece with the name of a mythological creature. The exact title was generally chosen after the piece was completed since the exact form of each wasn’t specified in advance—the processes I used to create the pieces weren’t really conducive to pre-defined layouts of shape and color.
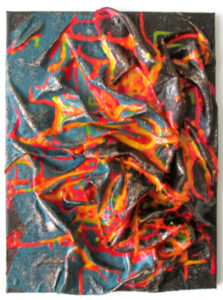
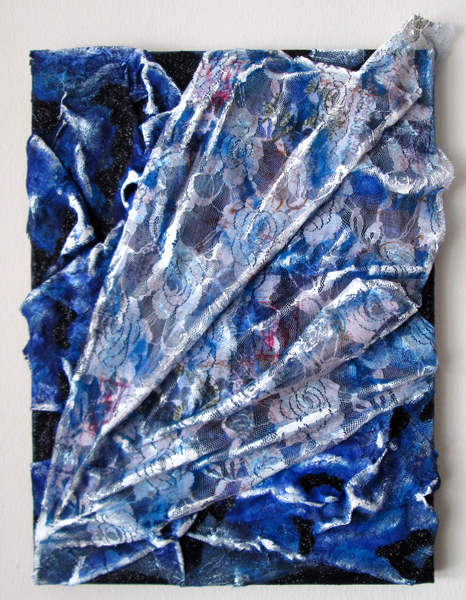
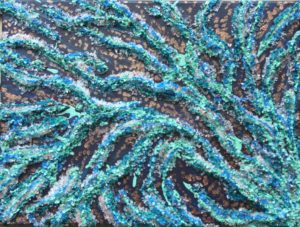
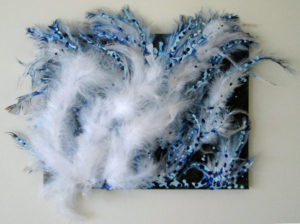
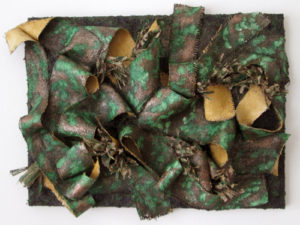
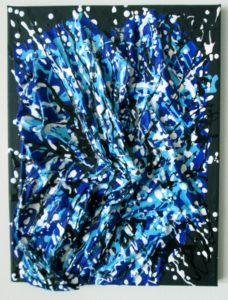
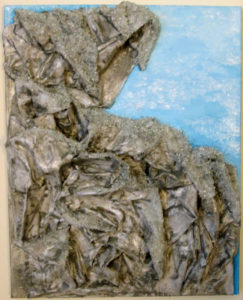
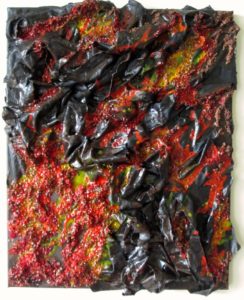
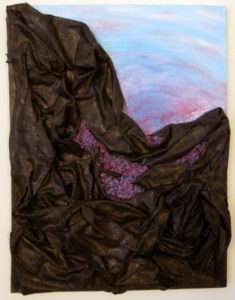
I started with the fire pieces: Dragon, Phoenix, and Firebird. These were done in red, oranges, and yellows and as you can see, the textures and designs are quite varied. The water pieces—Hydra, Kelpie, and Kraken—were done in blue-green tones while the air pieces—Pixie, Griffin, and Harpy—were done in blues and whites. The earth pieces—Golem, Satyr, and The Green Man—were done in browns and greens. I also tried to bring in texture that suited the element when possible—feathers for Griffin or the lacy, airy fabric for Harpy, for example, or the rough, earthy burlap of Satyr and the moss and pinecones in The Green Man.
This series was about exploring how I viewed the colors and textures I associated with the four elements, my feelings behind them, rather than attempting to create predefined physical representation of the elements.
Tell me about a series you’ve worked on or have planned. I’d love to hear about it!

Life and Tips: Working in a Series
When I was in college, one of my art professors suggested that it would be good to start working on pieces that were in a series. Before that point I, like most art students, was focused on individual projects and pieces, with no attempt at creating an over-arching theme or connection between pieces. Now partly this is simply due to being a student. You take classes and your professors dictate what you should be working on to a large extent. And that’s fine, up to a certain level. But eventually you reach the point where you need to take your art further than just developing proficiency in a technique or medium. That is when working in a series comes in.
Why work in a series?
One of the main benefits to working in a series is that it gives you a chance to fully explore a subject, thinking about it deeply and fully. With a deeper understanding of your subject, you can express it on a deeper, more meaningful and insightful level than if you just create one or two pieces. For the viewer, a series provides a cumulative effect– multiple related pieces craft a deeper understanding of the artist and their work. Working in a series also creates a cohesive body of work that can, for example, be used for showing in galleries or exhibitions.
How to create a series
When working in a series, the first step is to choose your subject. Now, I’m using “subject” loosely—it doesn’t have to be a specific item or physical object, though it certainly can be. There’s absolutely no reason your subject can’t be flowers or old barns or cats or whatever else you want! But your subject can also be more abstract. It can be a technique or pattern or color. It can be a certain texture or design or even an emotion that you are exploring. Basically, your subject is the overall unifying theme for the pieces in your series.


As an example, I created my “Elementals” series to explore the four elements of fire, water, air, and earth. I also have a series—“Below the Surface”—that was inspired by a trip to a rock and mineral show. The subject for that series was geological features.
Once you’ve chosen your subject, the next step is to define what your series will consist of. Brainstorm your possibilities. I find it helpful to do a series of quick sketches to lay out my ideas. These are mostly just rough, gestural sketches—not detailed, specific images—which help me to visualize the series and the connections between the pieces. Detailed sketches can come later, when you’re ready to start creating. Set your series specifications. How many pieces will be in the series? What size or sizes will they be? Consider your sketches and ideas with the focus of seeing how these pieces will form a cohesive set.

For my “Elementals” series, I knew that I wanted to have three pieces for each element and all the pieces were going to be on the same size canvas. I wanted to explore color and texture, and having the same canvas size helped to create a sense of unity for the pieces. “Below the Surface” was a little different. Each piece was wildly different in size, shape, color and texture. The unifying feature here is primarily the subject itself. This is also a series where I had many more ideas than made it into reality. Of course, there’s no reason I can’t go back and add to the series. All it takes is a trip back through my sketchbook to remind myself of the ideas and then set myself to bringing them to life.

Now that you’ve got your theme and know what pieces will be in your series, it’s time to get to work and make art!
What about you? Do you work in series? If not, why? If so, what things do you consider when developing your series? Tell me in the comments!
Art Techniques: Mixed Media: Crushed Glass
One of the materials I’ve found useful and interesting when working on my abstract mixed media pieces is crushed glass. It’s not a typical art material, so it can be difficult to get a hold of at a good price. I often find it in stores that sell home décor items—usually in the aisle with the vase fillers and candles. Sometimes I even get lucky and find some at the dollar store!
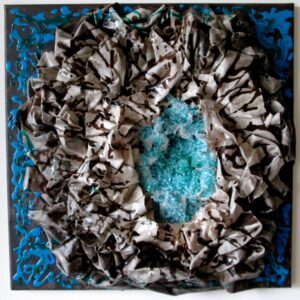
Generally I will use crushed glass when I’m trying to add a thick, sharp, chunky texture to a piece, though it’s also useful for it transparency in certain situations. In my “Below the Surface” series, I used crushed glass in a number of pieces, since the inspiration for the series was rocks, minerals and geological features. The glass makes good ‘crystals’!
In Glacier, I wanted the clear, translucency of the glass to remain, to simulate ice crystals, so I attached it directly with my trusty acrylic soft gel medium, which wrote about previously here. Geode was similar, but I used a blue-tinted glass instead of clear. A difficulty with this method is that no matter how much soft gel medium
you put down first, there will always be some glass pieces that didn’t stick well and fall off when you move the piece.
Crushed glass can also be used more for the texture, which is how I used it in Cave 1 and Crevasse. In these pieces, I attached the crushed glass by sprinkling it over a thick layer of soft gel medium, but then I used acrylic paints thinned with pouring medium
the top of the glass. This gives me the coarse texture without the translucence and also helps to make sure the glass fragments are securely attached to the canvas.
Other potential drawbacks to using crushed glass are the sharp glass fragments than can get scattered over the floor. I tend to work in my studio barefoot, so this can be hazardous. Though admittedly, most of the glass pieces aren’t lethally sharp or anything. I’ve never actually gotten one stuck in my foot, anyway. They’re still not too comfortable to step on. The glass also can add quite a bit of weight to the finished piece, depending on how much glass is used. Kelpie, from my “Elementals” series, for example, is heavy enough that it needs a pretty sturdy hanger to keep it on the wall. I was using those 3M Command Picture Hanging Strips in my previous apartment and I think it took 4 strips before the piece stopped falling off the wall. (Also, if you haven’t tried 3M Command Strips
, they’re Awesome. Especially in a rented apartment where you can’t or don’t want to put holes in the wall.)
What unusual materials have you used in your art? Are there any materials you’ve seen somewhere and thought “Hey, that might look pretty cool in my artwork”? Tell me in the comments; I’d love to hear about it!
* Please note that this post contains affiliate links and any sales made through such links will reward me a small commission – at no extra cost for you.